Why learning three core fishing knots beats memorizing fifty
Most beginners search how to tie a fishing knot and end up overwhelmed. Long lists of fishing knots, diagrams, and Latin sounding names make a simple knot tie feel like exam prep, not a quiet morning on the lake. You only need three strong reliable connections to cover almost all recreational fishing with modern lines.
On my local lake near Annecy, I watch new anglers lose fish because the knot tied to the fishing hook fails, not because their lure or rod is wrong. The weak point is almost always between the hook lure or lure swivel and the line, especially when braided fishing line meets a cheap swivel or oversized clip. When you focus on one everyday clinch knot, one stronger palomar style knot, and one uni knot for joining lines, your ends fishing become predictable and your confidence climbs.
Think of each fishing knot as a specific tool, not a party trick. One tying knot connects hook to monofilament or fluorocarbon, another knot uni style joins leader to main line, and a third creates a loop for fly fishing or twitchy lures. Once these three knots are tied cleanly and tested, every extra pattern is just a variation, not a new language.
How line type changes the right knot choice
Monofilament lines are forgiving, stretch slightly, and grip on themselves, so an improved clinch or standard clinch knot bites well. Braided lines are thinner for their strength and very slick, so a palomar knot or doubled uni knot gives a much stronger hold on the fishing hook or lure swivel. When you add a fluorocarbon leader between braided fishing main line and the terminal tackle, a uni knot or surgeon style connection handles the different diameters.
For panfish and perch on light monofilament, a simple improved clinch knot tied carefully is usually enough. When you step up to pike or zander with braided main lines and a fluorocarbon leader, the same fishing knots must be adapted with more wraps and a properly moistened cinch. Matching each knot tie to the line material is what separates a casual setup from a strong reliable system that survives real fights.
Ask yourself one question before tying any knot to a fishing hook or lure. Am I using monofilament, fluorocarbon, or braided fishing line, and is there a leader in the system. Once you answer that, the choice between clinch knot, palomar knot, and uni knot becomes automatic rather than guesswork.
The improved clinch knot as your everyday workhorse
If you only learn one way of how to tie a fishing knot for hooks, start with the improved clinch. This fishing knot connects monofilament or light fluorocarbon lines to a fishing hook, small lure, or lure swivel with enough strength for most coarse and predator fishing. It is the knot I see most often on local rivers like the Saône when anglers are tying knot connections in low light.
To tie this clinch knot, pass the line through the hook eye, then wrap the tag end around the standing line five to seven times. Feed the tag back through the small loop above the eye, then through the larger loop you just created, wet the knot, and pull steadily until the coils snug down neatly against the hook lure. When the knot is tied correctly, the wraps sit side by side without crossing, and the tag end points away from the hook point to avoid catching weed.
The improved version of this tying knot simply adds that extra pass through the big loop, which locks the coils and makes the knot better for slightly heavier fish. With 0.20 mm monofilament lines for trout or perch, this improved clinch remains strong reliable as long as you trim the tag end with a little margin. When you move to thicker leader material above 0.35 mm, consider a palomar or knot uni style connection instead, because the stiff line does not cinch as cleanly in tight coils.
Common mistakes with the improved clinch knot
The most frequent failure I see is a dry knot tied too fast and yanked tight. Without moisture, friction heats the monofilament or fluorocarbon leader, weakens the material, and creates a hidden burn point that snaps on the next strong fish. Always wet the coils before you pull, then tighten with steady pressure rather than a violent jerk.
Another issue comes from too few wraps when tying knot connections on thin lines, especially below 0.18 mm. In that case, the clinch knot can slip under sudden load, so add one or two extra turns and check that the knot tied down fully against the eye. If the coils bunch up or cross, cut and start again, because a messy fishing knot is not a knot better than none, it is a failure waiting to happen.
When you start using shock leaders for heavier lure work, the improved clinch still has a place on the terminal end. For a deeper dive into choosing the right shock leader material and diameter before you even think about which knot tie to use, see this guide on selecting the correct shock leader for your fishing needs. Once the leader is matched to your target species, the improved clinch knot becomes a predictable link between your lines and your chosen fishing hook or lure swivel.
Palomar knot and uni knot for braided line and critical connections
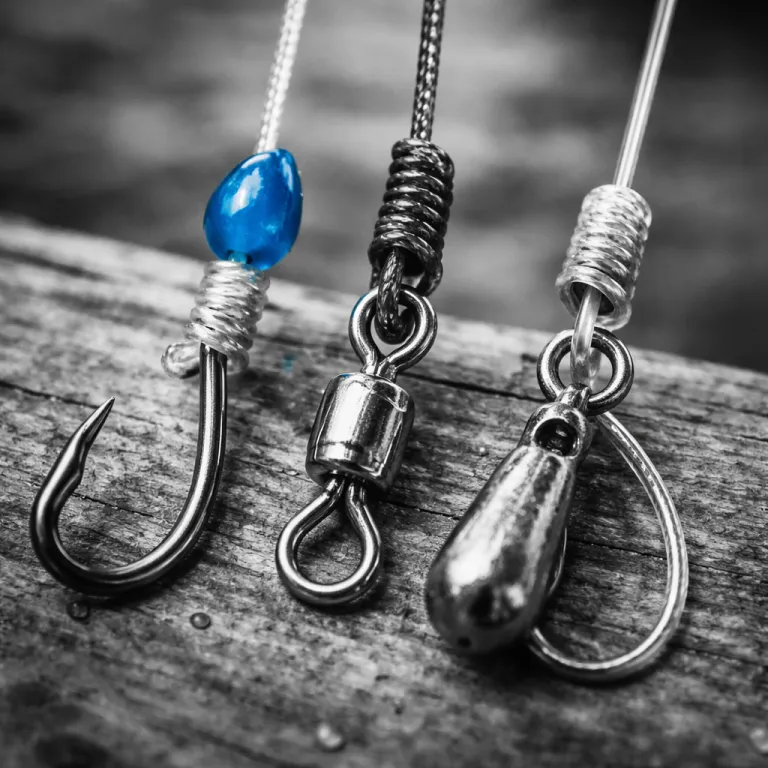
Braided fishing line changed how we think about how to tie a fishing knot, because slick fibres punish sloppy tying. On my pike setups with 0.18 mm braided main lines, a palomar knot at the lure swivel or snap has outlasted every other pattern I tested. This simple double line knot keeps almost all the original line strength when tied correctly and moistened before cinching.
To tie the palomar knot, double about 15 cm of line and pass the loop through the eye of the fishing hook, lure, or swivel. Tie a loose overhand knot with the doubled line, then pass the entire hook lure or lure swivel through the big loop before pulling on both the standing line and tag to seat the knot. When the knot tied down properly, the doubled section hugs the eye, the coils are smooth, and the tag end is short but not trimmed dangerously close.
The palomar is especially strong reliable on braided lines because the double strand spreads the load and the simple geometry avoids sharp bends. With monofilament or fluorocarbon leader, it still works well up to medium diameters, but can become bulky on very thick leader material. For that reason, I often use a palomar at the lure swivel on braid, then a different tying knot between the swivel and a heavy fluorocarbon leader.
Using the uni knot to join lines and build leaders
The uni knot is the most versatile pattern in my box, because one design handles both terminal connections and line to line joins. When you tie a knot uni to a hook, you pass the line through the eye, form a loop back along the standing line, then wrap the tag through that loop several times before cinching. The same structure, mirrored on two lines and pulled together, becomes a uni to uni connection that joins main line to leader.
For joining braided fishing main lines to fluorocarbon or monofilament leaders, a double uni knot with seven wraps on the braid and five on the leader gives a compact, strong reliable join. This fishing knot passes cleanly through rod guides on a 2.10 m spinning rod, which matters when you cast small lures for perch or zander. If you want to test how knot better design affects your casting distance and control, pair this setup with one of the modern baitcasting reels reviewed in the top baitcasting reels comparison.
When you use a fluorocarbon main line such as the Invizx multi species fishing line, the uni knot still shines at the terminal end. For a detailed look at how that type of 100 percent fluorocarbon behaves on the spool and under load before you choose your tying knot, read this test of the Invizx multi species fluorocarbon line for freshwater casting. Once you understand how your lines stretch and grip, the choice between palomar, clinch knot, and knot uni patterns becomes a deliberate decision, not a habit.
Loop knots and fly fishing: when a fourth pattern matters
Most spinning and baitcasting anglers can live happily with three core fishing knots, but loop knots earn a place when lure action or fly presentation matters. A non slip loop tied to a small crankbait or soft plastic lets the lure swing freely, which can trigger more fish on pressured waters. In fly fishing, a clean loop between the leader and the fly or between fly line and leader keeps the system aligned and easy to change.
To create a simple loop knot for a lure, start with an overhand knot in the line, then pass the tag through the hook eye and back through the overhand loop. Wrap the tag around the standing line several times, then return it through the overhand loop and tighten while holding the loop size you want in front of the hook lure. This tying knot keeps the lure from being choked tight to the line, which often makes small crankbaits and streamers track more naturally.
Fly fishing adds another layer, because you often connect different lines with welded loops or hand tied loops at each end. A perfection loop in the leader butt gives a strong reliable connection to the fly line loop, while a smaller loop knot at the tippet end lets the fly swing. Even here, the same principles apply as with any fishing knot, whether it is a clinch knot, palomar, or uni knot, because smooth coils, wet cinching, and correct tag length decide whether the knot tied will hold.
Choosing when to use a loop instead of a tight connection
Use a tight knot tie like an improved clinch or palomar when you want maximum control and minimal hardware, such as jig heads for perch or bottom rigs for bream. Switch to a loop when the lure or fly needs freedom to pivot, especially with suspending minnows, small spoons, or unweighted streamers. On clear lakes where fish see everything, a well tied loop can look more natural than a rigid connection to a lure swivel or snap.
Remember that every extra loop, swivel, or clip is another potential failure point in your ends fishing system. If you already have a swivel between braided main line and fluorocarbon leader, you may not need a second clip at the lure, just a direct loop knot. Keep the chain simple, keep each knot better than the last, and your overall rig will be stronger than any single component.
Whether you are casting a size 16 dry fly on a mountain stream or a 10 cm soft shad on a reservoir, the logic stays the same. Decide if the hook or lure should be locked in place or free to swing, then choose between a tight fishing knot or a loop knot accordingly. Once that decision is clear, the actual tying becomes a calm routine rather than a rushed guess.
Testing, troubleshooting, and building confidence in your fishing knots
Knowing how to tie a fishing knot on paper means nothing until you test it on the bank. Every time you tie a clinch knot, palomar, or uni knot, pull hard on the hook lure or lure swivel with your hand before you ever cast. If the knot slips, spins, or shows any sign of damage, cut it off and retie, because a knot tied twice on land is cheaper than one lost fish.
When a knot fails, look closely at the break point to understand the cause. A clean break far from the knot suggests damaged lines or abrasion on rocks, while a curly pig tail end means the fishing knot slipped rather than snapped. If the line is broken right at the eye of the fishing hook, you probably cinched a dry knot or crushed the coils, especially with monofilament or fluorocarbon leader material.
Keep a small notebook in your tackle bag and record which knots you used with which lines and which failures you saw. Over a season, patterns emerge, such as palomar knots excelling on braided fishing setups and improved clinch knots working better on softer monofilament lines for smaller fish. This habit turns vague knot anxiety into clear data, and your tying knot choices become as deliberate as your lure selection.
Practical drills to make knot tying automatic
Practice tying each fishing knot at home with a thick piece of cord and a large swivel or spare fishing hook. Sit at the table, repeat the improved clinch, palomar, and knot uni patterns until your hands move without conscious thought, then switch to actual lines and smaller hooks. Ten minutes a night for a week will do more for your confidence than another hour scrolling diagrams on your phone.
Once you are comfortable, practice tying knots in low light, because many real world sessions start or end in the dark. Turn down the room lights, or sit on the balcony at dusk, and tie a clinch knot, a palomar knot, and a uni knot to a hook lure or lure swivel without rushing. When you can tie each knot better in those conditions than you once did at the kitchen table, you are ready for cold fingers and wind on the bank.
In the end, strong reliable fishing knots are less about secret patterns and more about clean habits. Wet every knot tie, trim every tag end with a little margin, and never fish a knot you do not trust. The fish will test your work sooner or later, and the only scorecard that matters is not the spec sheet, but the tenth cast in the rain.
Key statistics on fishing knots and line strength
- The palomar knot can retain up to around 95 percent of the original line strength when tied correctly and moistened before tightening.
- The improved clinch knot is widely regarded as the most commonly used terminal fishing knot among recreational anglers for attaching hooks, lures, and swivels to monofilament or light fluorocarbon.
- Braided fishing lines typically require different knot choices than monofilament or fluorocarbon, because their slick surface can cause traditional knots to slip if not adapted with extra wraps or doubled lines.
- Using a dedicated leader between braided main line and the terminal tackle can significantly reduce visible line near the lure and improve abrasion resistance around rocks, wood, and other structure.
Frequently asked questions about tying fishing knots
Which fishing knot should a beginner learn first for general use ?
A beginner should start with the improved clinch knot, because it covers most everyday situations with monofilament or light fluorocarbon. This knot works well for attaching hooks, small lures, and swivels, and it is easy to tie consistently after a little practice. Once that feels automatic, adding the palomar and uni knots will extend your options without overwhelming you.
Is the palomar knot always better than the improved clinch knot ?
The palomar knot is usually stronger on braided line and many fluorocarbon setups, but it is not always the best choice. On very thick or stiff leader material, the palomar can become bulky and harder to seat cleanly against the eye. In those cases, an improved clinch or a well tied uni knot may give a more compact and reliable connection.
How can I stop my fishing knots from slipping on braided line ?
To prevent slipping on braided line, use knots that double the line or add extra wraps, such as the palomar or a double uni knot. Always wet the knot before tightening and pull steadily on both the standing line and tag end to seat the coils. Avoid simple overhand or basic clinch knots on braid, because the slick fibres do not grip well without these adaptations.
Do I really need a different knot to join main line and leader ?
Using a dedicated line to line knot such as a uni to uni or surgeon style connection gives a smoother, stronger join between main line and leader. These knots are designed to handle different diameters and materials, which is common when pairing braided main line with fluorocarbon leader. While you can use swivels instead, a direct knot join passes through rod guides more easily and removes one extra piece of hardware.
How often should I retie my knots during a fishing session ?
Retie your knots whenever you change lures, after landing a big fish, or any time the line shows abrasion near the hook or swivel. On rocky or snaggy bottoms, checking and retying every hour is a good habit, especially with lighter lines. It is better to spend a minute on a fresh knot than to lose a fish and a lure to a weakened connection.